I had been using my small solar panel, PWM charge controller and car battery to charge eneloops by USB, but after a voyage of discovery, I just built a very energy efficient charger that does 6 x eneloop AA cells at a time. Crucially, It does not need solar charge converter and does not need any reservoir car battery.....
Construction Time about 30 Minutes.
Why bother????? Because I wanted to liberate some parts and be able to charge maximum number of batteries per day. Also i was annoyed at how few batteries my panel could charge per day and the energy wasted.
And the project didn't need much skill, which is always an advantage.
Ingredients....
Any solar panel that pushes out between 12V and 30 Volts max. I had a ECO-WORTHY 25 Watt 12 Volt at (£30 from amazon)
An 8 cell AA battery box About (£4 from ebay)
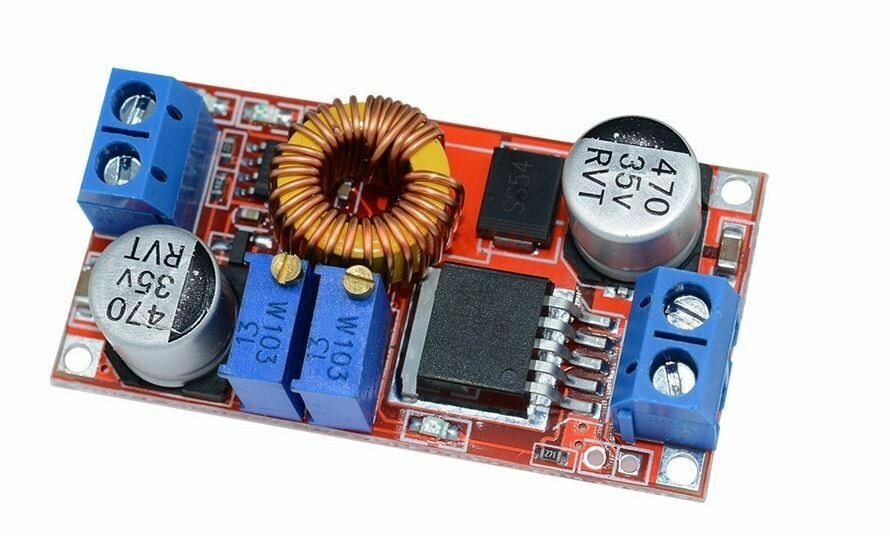
An XL4015 Constant current/Constant voltage, Buck Converter (£3.50 from eBay)
About a foot of wire.
A plastic terminal strip from the back of the garage ( £1 at most at any decent hardware store)
You'll need the use of a multimeter, a small screwdriver and a stanley knife. No Soldering or woodwork required!
Now.... About the XL4015. Don't be intimidated. It's a ready made module with a couple of screw terminals. This magical module INCREASES the charging current available from the solar panel and regulates the charge voltage and current.
Secret sauce..... The 8 cell battery box holds 6 cells and the XL4015 goes in the other two slots!
When complete, the charger will charge SIX Eneloop AA cells at 250mA or as much as you see fit. It can be adjusted to cut off when they are fully charged, or can trickle charge them.
From here on in, if you blow yourself up, don't blame me. Constantly check wiring polarity against the labelling on your own circuit board. Boards vary a little bit.
Preferably, before doing the constructing, connect your solar panel to the input of the module. In decent sun.
With a multimeter set on 200V, measure the output voltage. Turn the brass voltage adjusting screw nearest the middle of the module, to set the voltage to 9V (Clockwise to increase, anticlockwise to decrease)
With the multimeter set on 10A range, connect it to the output and set the other brass screw to get the current to 0.25A.
Those are now the output limits, geared to charging the six cells at 250mA
If in doubt, ask the seller for a link to the specification sheet for your module.
Now to the constructing...
OK... A picture paints a thousand words.....
Modify the battery box by removing one of the cell separators, with a knife and some jiggling and pull out two of the battery terminals.. We will rearrange them to save on the need to do soldering.
Rearrange the wiring, as below. Later, you may need to bend the +ve terminal with the wire so that it reaches the battery terminal.
Tidy the wiring away.
If required you may need to scalp some plastic from the box lid. Depends on the design of your module.
Switch the box ON WITH NO BATTERIES IN!!!!!
With the solar panel connected, check the polarity and voltage and short circuit current at the two wired terminals, one at each end.
Pop the batteries in. Put the lid on.
Come back later when they are charged...... Sorry. Can't say how long. it should take 16 Hours of sunshine from fully depleted.
take out those charged batteries and charge another 6, and another six.....
Later project will be a modified conversion to use one of these modules to make a FAST USB charger.

